Showing posts with label house. Show all posts

4.17.2011

An Addition to the Kitchen

My kitchen redo began last summer. I plan to write a LONG post about the entire process when I am completely finished, but today I just want to reveal my fab chalkboard that I created this week.

In my last post, there was a picture of this great thrift store frame I snagged one weekend.

 The frame.


I loved the curves in the frame. After getting it home I just knew I wanted to turn it into a chalkboard. After mending the frame a bit and lightly sanding it I painted it with the same green color that we have been using for the other pieces that we have completed lately. (But I promise, this is the last green piece for a while!) After searching all over for a how-to on applying chalkboard paint to glass, I just went for it. I tried sanding lightly first, but I don't think it made a difference. I used four coats in all.

Painted.


I used this.


Then, I antiqued it using the same method mentioned here. After letting it dry for 24 hours, we got to work putting it back together.

My handy man working hard. :)


M had to help with the nail bending and then we shoved some cardboard under them to keep the glass from moving. Gotta love a quick fix! And now, it hangs in my kitchen just waiting to be written on... I have to go buy some chalk first.

Love.


I'm linking up this transformation at these places...


UndertheTableandDreaming

3.30.2011

Our First DIY!

So I mentioned a couple of days ago that Michael and I have tried a couple of DIY projects. And I must say, I am very excited about the success we have had! Usually if something gets too tricky or expensive (yikes!) I tend to give up. But these projects were simple and cheap. And that I love!

Last Fourth of July we were riding to a friends house to celebrate the holiday and on the side of the road was this beauty.


Seriously, just sitting there!


With plenty of space for Michael's junk inside.


And a broken drawer.


We turned around to check it out and decided it was a keeper. Then we went and asked a friend to help pick it up because BOY is it heavy. It's had a lovely home on our back porch since then.

After being tired of looking at it, Michael got the project started. He rebuilt the draw at the bottom, sanded the entire piece, and primed it. Because he had been doing all of the hard work, he got to choose the paint color. Although he wanted a dark green (what does that mean anyways?) I convinced him to lighten it up a bit and we chose a more acceptable color (I just tried to check the color and can't find the paint can.). After giving it two coats we stood back and took a look. Ahhhh! We had made a mistake. It was an awful army green that looked like it belonged more on a camo jacket than our guest room.

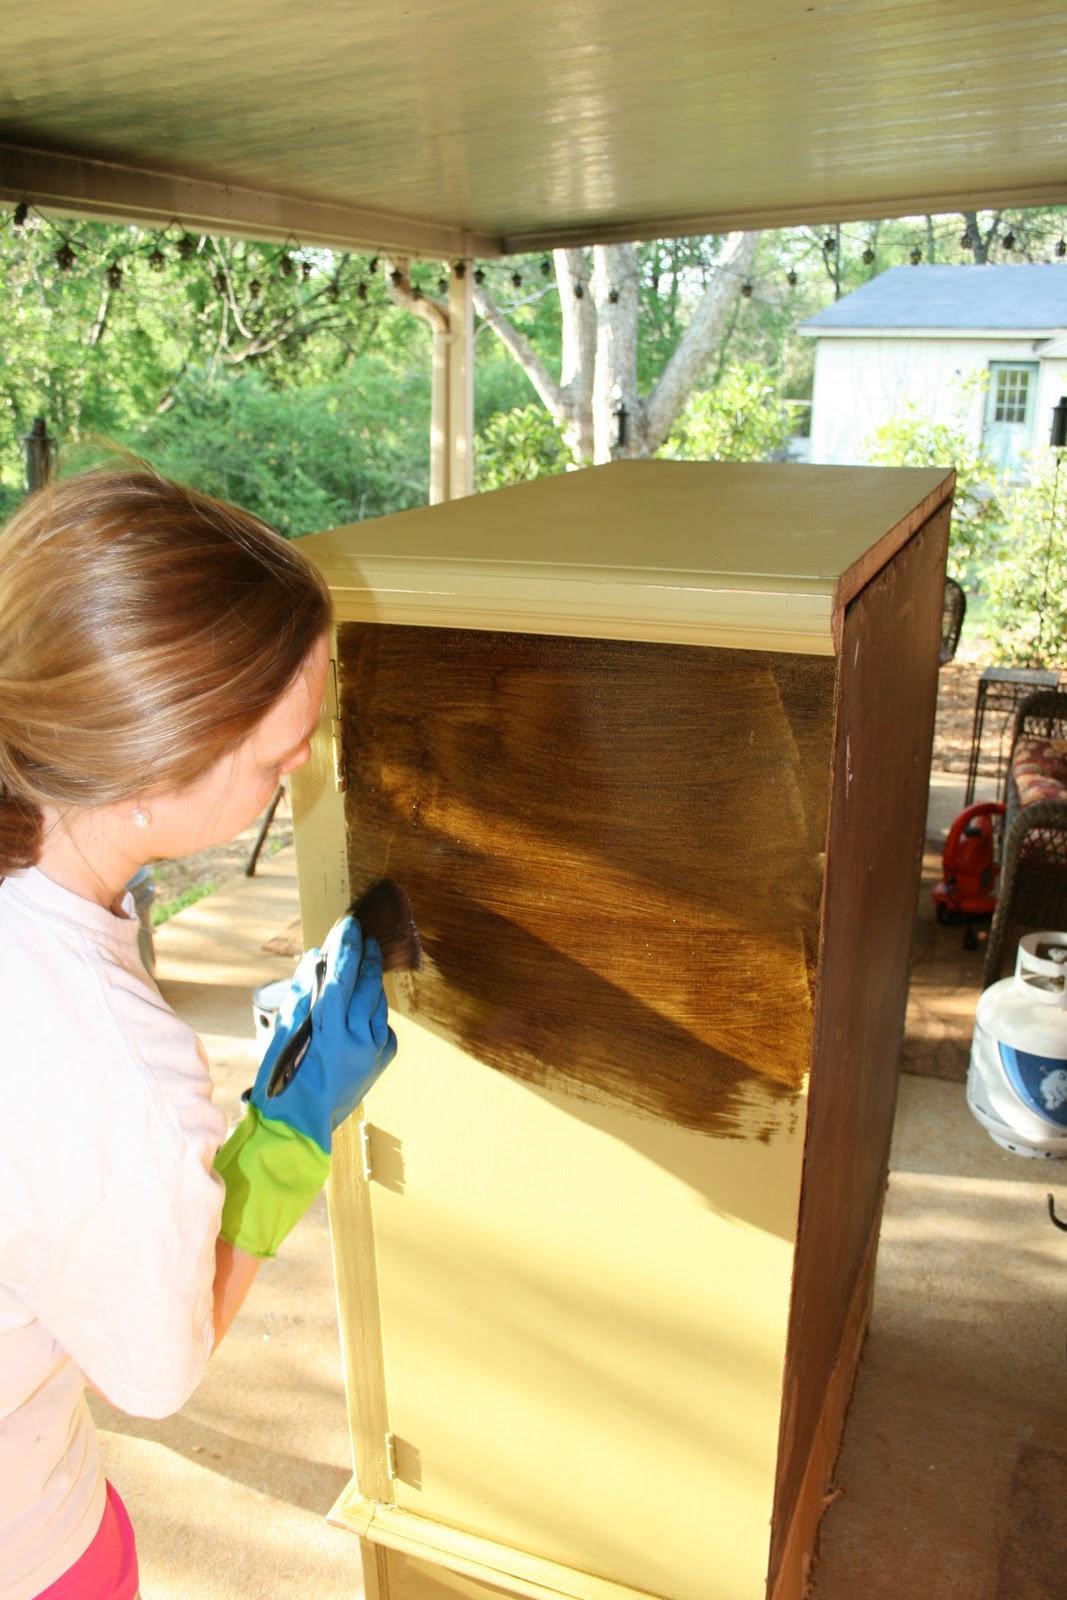
Solution time -- I had recently come across Kristi's blogpost over at Addicted 2 Decorating that explained how to antique a piece of furniture. It completely changed the look of it. Although we didn't use the neutral eggshell color that she chose, we decided to give it a try. We headed back to Lowe's and bought a can of Minwax Wood Finish Stain in Dark Walnut. I distressed it with the sander, brushed on the stain, and wiped it away with a cloth.

Proof of my labor.


Thank goodness for the Internet! That saved us from having to sand, prime, and paint again. It looks fabulous! And although I found others who said using an oil stain over latex paint would be a mess, it worked perfectly! But -- DO let the stain dry for at least 24 hours before using a polyurethane. We bought a spray so that it would be quick and easy. Then, a few hardware changes and...

Voila!


We just love how it turned out! It's the first finished piece for the guest room so I guess we will have to work the other projects around it. We are both just so happy that it turned out so well after being skeptical of the yucky green color. Michael loved it so much that he even refinished a side table for our patio the same way.


I'll update with finished pictures of the patio this weekend after we remove the flowers that I talked about earlier in the week.

Linked Up at The DIY Show Off

3.28.2011

Blogging for real.

I'm blogging. Again.

I deleted all of the old school posts and now declare this my blog. I have had an obsession with reading blogs for years. I can't say that I fully keep up with any of them for too much time, but I just LOVE reading about the lives of others. Lately, I have had an obsession with DIY blogs. So much so that I have DIY'ed with the hubs twice so far and have plans for more. But that's another post I'm saving for later. But for this post...

I love spring. :)

Every year Michael and I get really excited during the first warm spell and declare that it's time to clean up the yard. We haven't had the best success but we enjoy spending the time picking out flowers and plants, planning where we will put them all, and looking back during the first couple of weeks and enjoying all of our money going down the drain good, hard work.

So, it's that time of the year. We have been looking for weeks. This weekend we finally bought lots of great things and are ready to go. Here's some of the process.

We bought lots of begonias this year. 


A few planted pots.


And some ivy in window boxes.


The plan is to get everything planted before this weekend because we are getting ready for Michael's parents 30th anniversary party. And I'm sure the guests would appreciate being able to walk freely around the patio.